Adding ProxySQL and HAProxy to Your MariaDB Galera Cluster for Complete High Availability
Implementing query routing and automatic failover on top of your existing Galera cluster
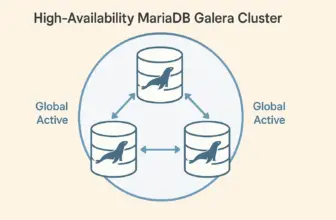
In our previous post, we established a 3-node MariaDB Galera cluster that provides active-active database replication with zero data loss. While this foundation offers excellent database-level high availability, production environments require additional layers of protection to eliminate every possible point of failure.
See High Availability MariaDB Galera Cluster for the foundation setup. This post adds ProxySQL for intelligent query routing and HAProxy for connection-level failover, creating a complete HA stack that provides transparent failover capabilities while optimizing database connections and query performance.
Prerequisites
- Functional 3-node MariaDB Galera cluster (see our previous guide)
- Root or sudo access on all database servers
- Additional VM for dedicated HAProxy instance
- Network connectivity between all servers
- Firewall configured for Galera cluster communication
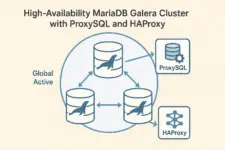
Multi-Layer High Availability Architecture
Complete HA Stack Components
↓
HAProxy (Connection Failover)
↓
ProxySQL (Query Routing)
↓
Galera Cluster (Database HA)
Each layer provides specific protection against different failure scenarios, creating a system where no single component failure can compromise application availability.
Protection Layers and Benefits
Galera Cluster Layer
- Active-active database clustering
- Synchronous replication, zero data loss
- Automatic node failure detection
- Geographic distribution support
ProxySQL Layer
- Database-aware query routing
- Connection pooling and optimization
- Health monitoring of database nodes
- Read/write splitting capabilities
HAProxy Layer
- TCP-level load balancing
- ProxySQL instance health checks
- Automatic proxy failover
- Single connection endpoint
Step 1: Install ProxySQL on Database Servers
Install ProxySQL on all three Galera cluster nodes to provide database-aware routing and connection pooling:
# Download ProxySQL for your architecture from GitHub releases
# Visit: https://github.com/sysown/proxysql/releases
# Download the appropriate package for your system (amd64, arm64, etc.)

# Example for amd64:
wget https://github.com/sysown/proxysql/releases/download/v3.0.2/proxysql_3.0.2-ubuntu24_amd64.deb
sudo dpkg -i proxysql_3.0.2-ubuntu24_amd64.deb

# Start and enable ProxySQL
sudo systemctl start proxysql
sudo systemctl enable proxysql

# Open firewall port for ProxySQL
sudo ufw allow 6033/tcp
Step 2: Create Database Users for ProxySQL
ProxySQL requires specific database users for connections and health monitoring. Create these on any Galera node (they’ll replicate automatically):
# Connect to any Galera node
mysql -u root -p

# Create ProxySQL application user
CREATE USER 'proxysql'@'%' IDENTIFIED BY 'your_proxy_password';
GRANT ALL PRIVILEGES ON *.* TO 'proxysql'@'%' WITH GRANT OPTION;

# Create ProxySQL monitor user for health checks
CREATE USER 'monitor'@'%' IDENTIFIED BY 'monitor_password';
GRANT USAGE ON *.* TO 'monitor'@'%';

FLUSH PRIVILEGES;
Step 3: Configure ProxySQL Backend Servers
Configure ProxySQL to route connections to your Galera cluster nodes. Apply this same configuration to all three ProxySQL instances:
# Connect to ProxySQL admin interface
mysql -u admin -padmin -h 127.0.0.1 -P6032

# Add your Galera backend servers (use your actual IPs)
INSERT INTO mysql_servers(hostgroup_id, hostname, port, weight) VALUES
(0, '192.168.1.10', 3306, 1000),
(0, '192.168.1.11', 3306, 1000),
(0, '192.168.1.12', 3306, 1000);

# Add the application user
INSERT INTO mysql_users(username, password, default_hostgroup) VALUES
('proxysql', 'your_proxy_password', 0);

# Configure monitoring credentials
SET mysql-monitor_username='monitor';
SET mysql-monitor_password='monitor_password';

# Load and save configuration
LOAD MYSQL SERVERS TO RUNTIME;
LOAD MYSQL USERS TO RUNTIME;
LOAD MYSQL VARIABLES TO RUNTIME;
SAVE MYSQL SERVERS TO DISK;
SAVE MYSQL USERS TO DISK;
SAVE MYSQL VARIABLES TO DISK;
Step 4: Test ProxySQL Connectivity
Verify that ProxySQL can successfully route connections to your Galera cluster:
# Test ProxySQL connection from each database server
mysql -u proxysql -pyour_proxy_password -h 127.0.0.1 -P6033

# Verify you can see your databases
SHOW DATABASES;

# Test query routing
CREATE DATABASE test_proxysql;
USE test_proxysql;
CREATE TABLE test (id INT AUTO_INCREMENT PRIMARY KEY, data VARCHAR(50));
INSERT INTO test (data) VALUES ('ProxySQL working');
SELECT * FROM test;
Step 5: Set Up HAProxy Server
Deploy HAProxy on a dedicated server to provide automatic failover between ProxySQL instances:
# Install HAProxy on dedicated server
sudo apt update
sudo apt install haproxy

# Open firewall for ProxySQL connections
sudo ufw allow 6033/tcp
Step 6: Configure HAProxy for ProxySQL Load Balancing
Configure HAProxy to balance connections across your ProxySQL instances with automatic health checking:
# Edit HAProxy configuration
sudo vim /etc/haproxy/haproxy.cfg

# Add this configuration:
global
    daemon

defaults
    mode tcp
    timeout connect 5000ms
    timeout client 50000ms
    timeout server 50000ms

frontend db_frontend
    bind *:6033
    default_backend db_backend

backend db_backend
    balance roundrobin
    option tcp-check
    tcp-check connect port 6033

    server proxysql1 192.168.1.10:6033 check
    server proxysql2 192.168.1.11:6033 check
    server proxysql3 192.168.1.12:6033 check
Step 7: Start HAProxy and Test the Complete Stack
# Start and enable HAProxy
sudo systemctl restart haproxy
sudo systemctl enable haproxy

# Test the complete HA stack
mysql -u proxysql -pyour_proxy_password -h haproxy_server_ip -P6033

# Verify connection routing works
SHOW DATABASES;
USE test_proxysql;
SELECT * FROM test;
Step 8: Configure Applications for HA Stack
Applications now connect through the HAProxy endpoint, gaining automatic failover at all levels. Update your application configurations:
# Application database configuration
database_host: haproxy_server_ip
database_port: 6033
database_user: proxysql
database_password: your_proxy_password
database_name: your_app_database
Example: WordPress Configuration
# Docker Compose example
services:
  wordpress:
    image: wordpress:latest
    environment:
      - WORDPRESS_DB_HOST=haproxy_server_ip:6033
      - WORDPRESS_DB_NAME=wordpress
      - WORDPRESS_DB_USER=proxysql
      - WORDPRESS_DB_PASSWORD=your_proxy_password
    ports:
      - "8080:80"
Critical Configuration Requirements
Firewall Requirements
All nodes must have these ports accessible for proper cluster communication:
# Required ports on all database nodes
sudo ufw allow 22/tcp   # SSH access
sudo ufw allow 3306/tcp # MariaDB client connections
sudo ufw allow 4567/tcp # Galera group communication
sudo ufw allow 4567/udp # Galera multicast
sudo ufw allow 4568/tcp # Incremental State Transfer
sudo ufw allow 4444/tcp # State Snapshot Transfer
sudo ufw allow 6033/tcp # ProxySQL connections
User Authentication Configuration
ProxySQL requires both database users and proxy user configuration. The monitoring user prevents authentication failures during health checks:
# Create database users for ProxySQL
CREATE USER 'app_user'@'%' IDENTIFIED BY 'secure_password';
GRANT ALL PRIVILEGES ON app_database.* TO 'app_user'@'%';

# Create monitoring user for health checks
CREATE USER 'monitor'@'%' IDENTIFIED BY 'monitor_password';
GRANT USAGE ON *.* TO 'monitor'@'%';
FLUSH PRIVILEGES;
Failure Scenario Protection
Database Node Failures
- 1 node down: Cluster continues normally
- 2 nodes down: Read-only mode protection
- Automatic node rejoin after recovery
- Zero data loss with synchronous replication
ProxySQL Instance Failures
- HAProxy detects failed ProxySQL instances
- Automatic routing to healthy proxies
- Connection pooling minimizes disruption
- Applications remain connected
Network Partition Recovery
- Quorum-based split-brain protection
- Geographic distribution resilience
- Automatic cluster recovery
- Site-level failure protection
Operational Benefits
Transparent Application Integration
Applications require minimal configuration changes to leverage the complete HA stack. A single connection endpoint provides access to the entire distributed infrastructure:
# Application configuration
database_host: haproxy_server_ip
database_port: 6033
database_user: app_user
database_password: secure_password
Maintenance and Scaling Operations
The multi-layer architecture enables rolling maintenance without application downtime. Nodes can be updated, restarted, or replaced while maintaining full service availability through automatic failover mechanisms.
Security and Performance Considerations
Network Security
For distributed deployments across multiple sites, implementing VPN or mesh networking solutions like ZeroTier provides encrypted communication channels between cluster nodes. This enables secure geographic distribution without exposing database ports to public internet access. Note that distributed deployments may introduce additional latency depending on the geographic distance and network quality between sites.
Additional Security Measures
- SSL/TLS encryption for client connections
- Certificate-based authentication between cluster nodes
- Database encryption at rest for sensitive data
- Regular security auditing and access reviews
Performance Optimization
The distributed architecture may introduce slight latency, particularly for geographically distributed deployments. However, the performance impact is typically outweighed by the availability benefits. ProxySQL’s connection pooling and query optimization help minimize overhead while providing advanced features like query caching and read/write splitting.
Complete High Availability Achieved
By adding ProxySQL and HAProxy to your existing Galera cluster, you’ve created a comprehensive high availability stack that provides protection against failures at every level. Applications now benefit from intelligent query routing, connection pooling, and automatic failover without requiring any awareness of the underlying complexity.
What You’ve Accomplished
- Database-level HA through your existing Galera cluster
- Intelligent query routing and connection optimization via ProxySQL
- Proxy-level failover protection through HAProxy load balancing
- Single connection endpoint for simplified application configuration
- Transparent failover handling without application downtime
Next Steps: Your database infrastructure now provides enterprise-grade high availability. Consider implementing monitoring solutions to track the health of all components, and test your failover scenarios to ensure everything works as expected during actual failure conditions.